Monday, August 29, 2011

0 Gluten Free Key Lime Cupcakes


This past couple weeks have been quite daunting for me. I've been working quite a bit, so I sadly haven't had much chance to post recipes or cook. However, I have quite a few uber awesome recipes coming up, so I'm making up for it with high quality.

Now there are a lot of components to this dessert for sure, but all the hard work is worth the delicious pay off.

Here's a really zesty recipe that transforms key lime pie into a cake. It uses a gluten free graham cracker crust, homemade key lime curd, the cake recipe from my Tiramisu Cake, and a mascarpone cheese frosting. I hope you enjoy!

For the key lime curd, I use the following recipe from Allrecipes, "Fresh Lime Curd", and I substitute the lime juice with key lime juice. For this recipe, be sure to carefully temper your eggs, or else you'll end up with scrambled eggs in your curd.

Serves: 18 cupcakes
Prep Time: 35 minutes total

  • 5 minutes for the crust, 
  • 10 minutes for the cake, 
  • 10 minutes for the curd, 
  • 10 minutes for the frosting
Cook Time: 25 minutes for the cake, 30 minutes for the curd

Ingredients:
Crust
1 1/2 cup gluten free graham cracker crumbs
6 tbsp butter
1/4 cup sugar

Cake
227g eggs (4-5 large eggs)
227g white sugar
1 tsp lemon juice
2 tsp vanilla extract
2 tsp baking powder
85g white rice flour
57g potato starch
28g tapioca starch
28g almond flour
28g brown rice flour
227g melted butter


Frosting
5 egg yolks
1 cup sugar
1 cup mascarpone
1 1/2 cup heavy cream


Steps
Preheat the oven to 350F.


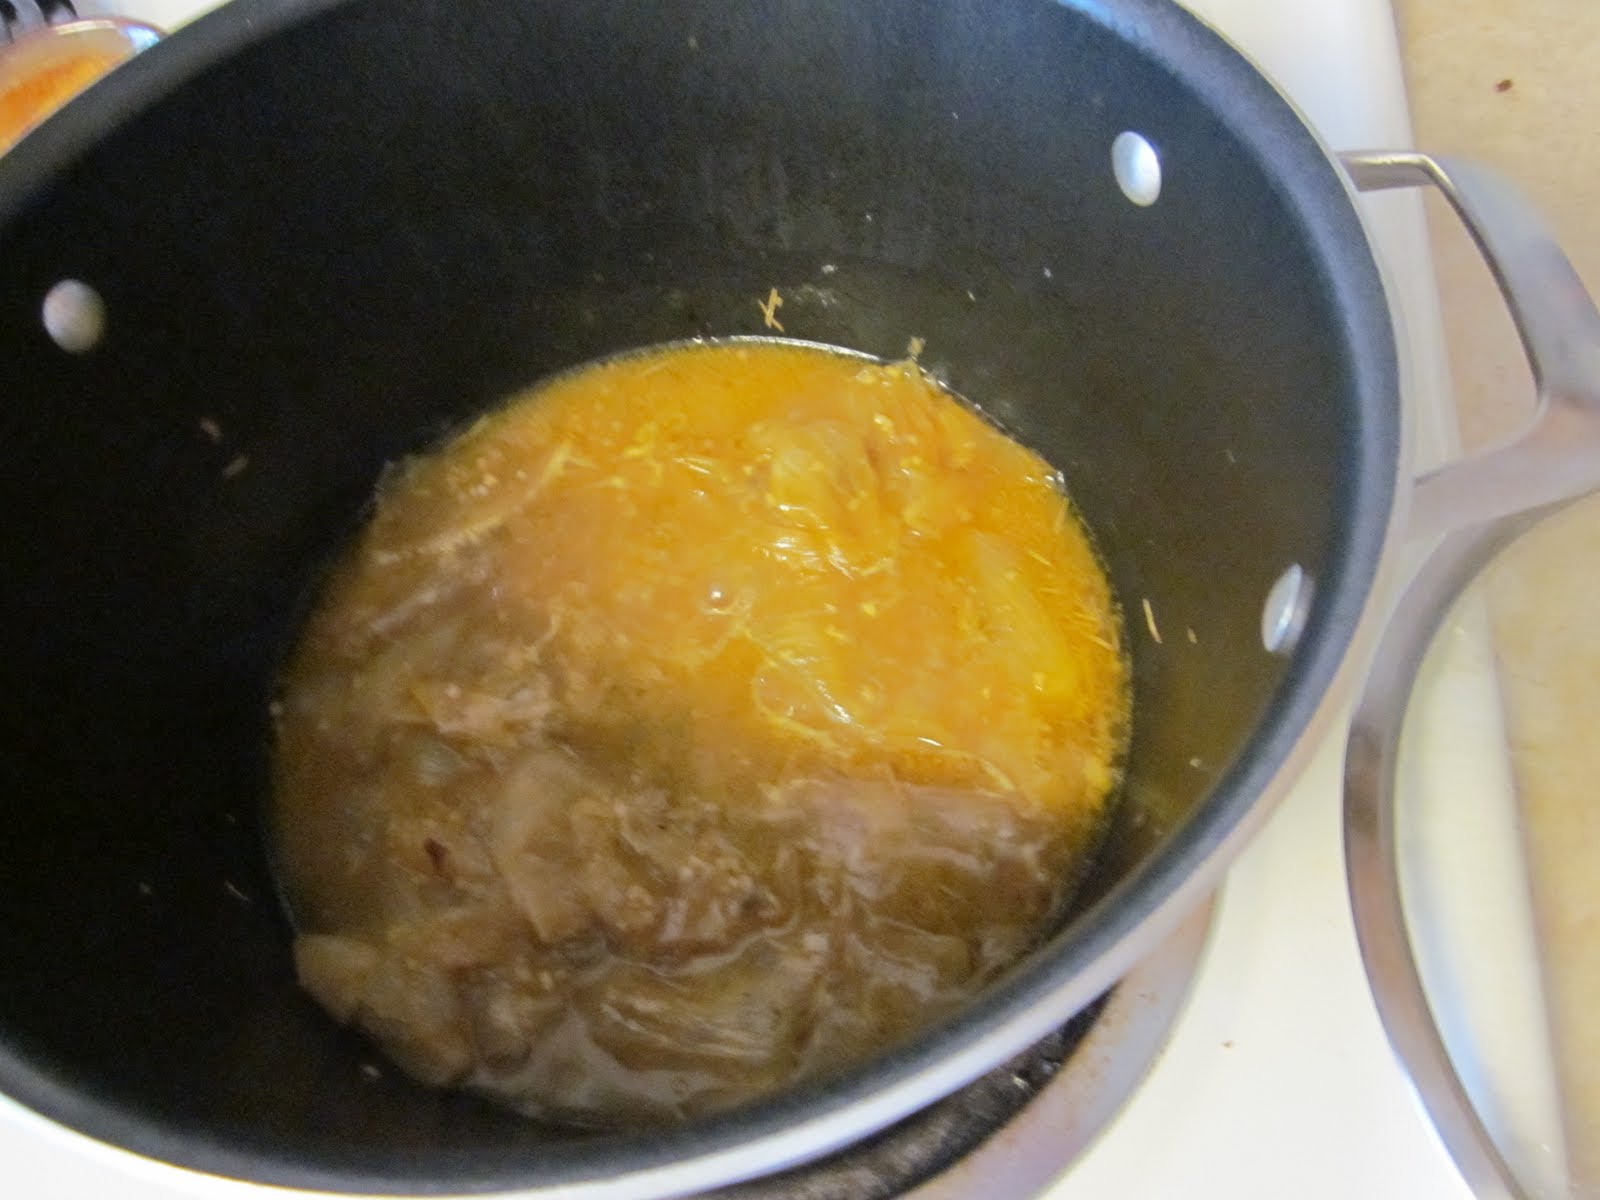
Prepare the Allrecipes version of Fresh Lime Curd. Click here for the link. Like I said before, be sure to replace the lime juice with the key lime juice, and be sure to carefully temper your eggs. At first the curd will look like this:
At the end after cooking, the curd will go from a grey-tan color to a bold golden green:


Refrigerate the curd while preparing the rest of the components. 


Crust
Line cupcake tins with paper cups. In a small bowl, melt all the butter. Combine the crust ingredients, and then spoon crust into the bottom of each cup. Spread the crust into even layers.


Cake
In a small bowl, combine all the flours.

Fill a shallow dish with warm water, and place an empty medium-sized mixing bowl into the dish. Add the eggs, sugar, lemon, and vanilla, beat for about a minute. Remove the eggs from the water and beat them until they have tripled in volume, which took me about 5 minutes.

Gradually fold the flour into the batter until fully combined. Pour the batter into the cupcake tines, and bake for 25 minutes, or until an inserted toothpick comes out clean.


Place the cupcakes onto a cooling rack and let them cool completely.


Frosting


To make the frosting, start a double boiler, and add the egg yolks and sugar. Cook over high heat until the sugar is dissolved, stirring constantly. Once sugar has dissolved, reduce to low heat and continuously whisk for 10 minutes. After the 10 minutes, remove the custard from the heat and whisk until it has thickened a bit, approximately 1 minute. Fold in the mascarpone until combined. Whip the cream in a chilled bowl until peaks form, and gently fold into the custard until well combined. Refrigerate the frosting until you are ready to frost.


Assembly


Using a circular piping tip, or a knife, cut holes into the middles of the cakes. 


Fill a Ziploc bag with the curd, and then cut off the tip to form a piping bag. Pipe the middle of the cakes with the curd.


Then frost the top of each cupcake with the frosting. Top the cupcakes with lime zest for garnish.


I hope you enjoy this recipe! Hope everyone has a good week!

Wednesday, August 24, 2011

2 Sunday Brunch


Not going to lie, if I could see this plate of pancakes every morning, I swear that I would have died and gone to heaven. This past weekend my friend Marggie and I decided to have Sunday brunch together at my house. For brunch we made my gluten free pancakes and fried some pancetta.

 The panel pictured above I used solely for the purpose of making pancakes. It's a Food Network skillet pan that my mom bought me for Christmas. It's got a non stick surface, and I totally recommend this pan. I barely use any spray oil and the pancakes are able to slide right off the pan.

The recipe that I used for these pancakes is located here: http://tcrumbley.blogspot.com/2010/08/gluten-free-pancakes.html

My greatest tip for these pancakes is to make sure the skillet is not too hot, and to flip them at the right time. To test the skillet, if a drop of water instantaneously evaporates from the pan, then the pan is too hot. You'll know that the pan is hot enough if water droplets dance around the pan before evaporating.

Meanwhile, wait to flip the pancakes when these two things happen:
1. the edges are not longer wet,
2. once the pancakes start to bubble, if you pop one of the bubbles and the pancake holds its shape.

I hope you enjoy these tips, and share some brunch-filled love with your friends and family this weekend!

Sunday, August 21, 2011

2 Gluten Free Smores Brownies

I will have to say, I love the Scheduled Posting Feature that Blogger has. With my 46 hour work week coming up, it'll be the only way I'll be able to post recipes over the course of this week!

As promised on Google+ (my public profile is located here) I'm posting my adaptation for Gluten Free Smores Brownies!
Chocolate Fountain?
My friend Mary sent me the recipe that I adapted, written by Homemade for Holman. You can find the link with the recipe here. I really didn't deviate from the original recipe, I only adapted it to gluten free. Therefore, I wanted to not only share this tasty recipe, but also how I made it gluten free.

For the crust, I substituted wheat graham crackers with Kinnkinnick Gluten Free Graham Cracker crumbs. Not only are they gluten free, but they taste just how I remember graham crackers tasting.
Ended up with a really cool picture of the milk and the oil separated.
For the cake, I did the following:

  • Did not add boiling water at the end
  • Reduced sugar to 1 1/2 cups
  • Substituted the 1 3/4 cup wheat flour with 1 cup white rice flour, 1/4 cup tapioca starch, 1/2 cup potato starch, 1/2 tsp xantham gum
For me, the boiling water made the batter too soupy, and it didn't bake quite right. Also, I prefer my chocolate cakes a little less sweet, so that is why I reduced the sugar.

Well I hope you enjoy this recipe as much as I did. It was the first time I used a butane torch and now I'm excited to use it in other applications.

Also, I've started to experiment more with my food photography, I'd love to hear your opinions!

Monday, August 15, 2011

1 Seared Steak and Potatoes


Once again I have a relatively busy week at work, but I wanted to share this rather delicious recipe and fun presentation of steak and potatoes! Serve it with basil butter for a colorful yet herbaceous presentation!

Serves: 3-4
Prep Time: 20 minutes
Cook Time: 20 minutes


Ingredients
1 lb london broil
salt and pepper
2 slices bacon
4 white potatoes, peeled and cubed
1 green onion diced
2 tbsp butter, room temp
1 tbsp milk
1/2 cup fresh basil leaves
1 tsp minced garlic


Steps
Preheat a grill pan to medium heat, spraying the pan with non stick spray. Season the steak with salt and pepper, and place on the pan once hot. For medium, let the steak cook for about 8-10 minutes, and then flip and let cook for another 8. Once done, remove from heat and let it sit for 5 minutes before cutting.

While the steak cooks, boil the potatoes in water for about 10 minutes or until tender. If you insert a fork in them without resistance, the potatoes are done. Drain the potatoes, and mash with a ricer or use an immersion blender to puree the potatoes. Add the butter, onion, milk, and some salt and pepper to the potatoes. Cook some bacon on medium heat in a pan, and once both sides are crispy (will take about 5-6 minutes) dice the bacon and mix it into the potatoes.
To prepare the basil butter, dice all of the basil leaves. Mix it together with the butter and garlic in a small bowl. Let it refrigerate until you are ready to serve.
When you are ready to serve, cut the sirloin into equal size portions. Scoop some potatoes onto a plate and place the steak on top. Spoon a small amount of butter (1/2 tsp - 1 tsp) into the top of each steak. I hope you enjoy this!

Tuesday, August 9, 2011

0 Orange Onion Pork Roast


Oh boy. August has been quite the busy month for me. Long work weeks do not work well with healthy diets and gluten free, which is why I like to make meals such as roasts that keep well over the course of the week, so I can cook once and eat it over the course of a few days. Here's a really easy pork roast that has a really tasty orange garlic sauce that I hope you enjoy! Serve with your favorite greens and seasoned rice!

Serves: 4-5 
Prep Time: 5 minutes
Cook time: 50 minutes

Ingredients:
2lb pork roast
1 medium onion
2 cloves garlic diced
3/4 cup orange juice
1 tbsp balsamic vinegar
1/4 white wine
2 tbsp oregano
1 tbsp thyme
1 tbsp rosemary
1 tsp paprika
salt and pepper

Steps:
Preheat a pot over medium high heat and add a few tablespoons of oil. Sprinkle salt and pepper on the pork, and  place into the pot. Let the pork cook for a few minutes, gaining a good sear. Flip the pork and continue cooking for another few minutes.

Reduce the heat to medium and add the onion and garlic. Once the onions begin to turn translucent, add the remaining ingredients. Stir the contents of the pot, reduce heat to medium low, and cover for about 40 minutes, or until the internal temperature is 140F.
Remove the pork from the pan, and cook the juice down over medium heat for about 10 minutes until the juice reduces to a sauce.

Serve the pork with vegetables and rice, spooning the sauce over top the pork.

I hope you enjoy!

Saturday, August 6, 2011

0 MyCityCuisine Promotion

Hi everyone! A little while ago I wrote about a site called MyCityCuisine, and for the next three weeks they're running a promotion to put their name out there and to get people to check out their site.


MyCityCuisine is giving away a Free City Walking Tour App (worth $4.99) to everyone who Likes them on Facebook. The app provides GPS coordinates and interesting descriptions for not only the main city sites, but for off-the beaten path destinations as well. People can sign up to receive the free city app of their choice by clicking the orange bar at the bottom of MyCityCuisine.org or by visiting their Facebook page.

Feel free to check it out!

Wednesday, August 3, 2011

33 Gluten Free Tiramisu Cake


It is time once again for the Gluten Free Ratio Rally! This month Kate from Gluten Free Gobsmacked hosted the event this month, and our assignment was WHITE OR YELLOW CAKE! Yum.
Perhaps the greatest thing I love about the gfreerally (other than the really tasty food that everyone creates) is the access to the knowledge of other food bloggers. I love the ability to work with everyone in researching the proper ratios and what actually makes a traditional white or yellow cake.

For this Ratio Rally Recipe, I use a ratio of:
flour : egg : sugar : fat 
1 : 1 : 1 : 1
Out of this opportunity, I learned of a completely new way of preparing a cake batter to produce a buttery, tender yellow cake. The nice thing with the texture of this cake was that I was easily able to separate it into a layered cake with minimal cracking or breakage.

The main reason I was excited for the white/yellow cake challenge is that growing up my mom had a small business of sort building and decorating cakes. It was part of what got me interested in cooking, and I'm excited to share this sophisticated cake. Feel free to exclude the rum in order to serve without any alcohol.

Please visit Kate's blog for her Gluten Free Basic White Birthday Cake Recipe, and for the complete list of Ratio Rally Recipes!


Prep Time: 1 hour
Bake Time: 40 minutes
Serves: 8-10

Ingredients
Cake
227g eggs (4-5 large eggs)
227g white sugar
1 tsp lemon juice
2 tsp vanilla extract
2 tsp baking powder
85g white rice flour
57g potato starch
28g tapioca starch
28g almond flour
28g brown rice flour
227g melted butter

Syrup
1/6 cup strong coffee, chilled
1 tsp rum

Frosting
5 egg yolks
1 cup sugar
1 cup mascarpone
1 1/2 cup heavy cream

Dark Chocolate for garnish


Steps
Preheat the oven to 350F. Line the bottom of an 8" round cake pan with parchment paper, and grease the bottom and sides of the pan. In a small bowl, combine all the flours.

Fill a shallow dish with warm water, and place an empty medium-sized mixing bowl into the dish. Add the eggs, sugar, lemon, and vanilla, beat for about a minute. Remove the eggs from the water and beat them until they have tripled in volume, which took me about 5 minutes.

Gradually fold the flour into the batter until fully combined. Pour the batter into the pan, and bake for 40 minutes, or until an inserted toothpick comes out clean. Once the cake is baked, remove from the oven and let cool completely. Once the cake is completely cool, run a knife along the edge of the pan and invert into a cooling rack.
While the cake cools, mix together the coffee and rum in a cup. To make the frosting, start a double boiler, and add the egg yolks and sugar. Cook over high heat until the sugar is dissolved, stirring constantly. Once sugar has dissolved, reduce to low heat and continuously whisk for 10 minutes.

After the 10 minutes, remove the custard from the heat and whisk until it has thickened a bit, approximately 1 minute. Fold in the mascarpone until combined. Whip the cream in a chilled bowl until peaks form, and gently fold into the custard until well combined. Refrigerate the frosting until you are ready to frost.


Once the cake is chilled, cut the cake in half so that there are two circle cakes. I have two techniques to recommend for this.
1. If you are scared of dividing the cake, take a long sewing string, and wrap it around the cake.  Gently tug the string until it cuts through the cake and splits it.
2. If you feel a little brave, use a really long, sharp knife to divide the cake in half. Be sure to cut slowly for your safety, and in order to allow you time to make the perfect cut.
Once the cake is divided, carefully place the bottom piece onto a plate. I normally use two large knives to get leverage in between the cake layers. It also never hurts to have a friend lend you some hands in order to safely transport the cake.


Using a pastry brush, brush the coffee onto the cakes, and drench them in the coffee. Let the cakes stand for a few minutes to soak in the coffee.
Now, its time to ASSEMBLE THE CAKE!
Mmmmmm creamy goodness. Favorite frosting ever.
Take a nice, large dollup of frosting and place on top of the bottom layer, and spread smooth. Place the top layer on top, and then secure the layers with toothpicks. I like doing this to prevent the cake from sliding everywhere when you frost it.

Frost the top of the cake, followed by the sides. After I frost the sides, I like to run the knife across the side of the cake for an uniform side at the end. If the frosting starts to melt (especially during the summer), place the cake in the fridge for a few minutes to firm up. Once the frosting is complete, use a potato peeler to shave chocolate on top of the cake.


I hope you enjoy this recipe! Be sure to check out the other Gluten Free Ratio Rally Recipes!

Thanks again to our host this month 

GF Basic White Birthday Cake by Kate @ Gluten Free Gobsmacked

GF Banana Rum Cupcakes with Rum Glaze (alcohol-free!) by Claire @ Gluten Freedom
GF Boston Cream Pie by Britt @ GF in the City   
GF Chocolate Hostess Cupcake Dupes by Erin @ The Sensitive Epicure
GF Chocolate Pistachio Pound Cake by Amie @ The Healthy Apple
GF Coconut Boston Cream Pie Cupcakes by Gretchen @ Kumquat-Blog
GF Confetti Cake by MaryFran @ FrannyCakes
GF Czech Cherry Bublanina by Rachel @ The Crispy Cook
GF Dark Chocolate Raspberry Cupcakes by Caroline @ The G-Spot
GF Frangelico Cupcakes with Nutella by Lisa @ Gluten Free Canteen
GF Fresh-Squeezed Lemon Cake by Caneel @ Mama Me Gluten Free
GF Lemon Poppy Seed Muffins by Marla @ Family Fresh Cooking
GF Lemon Tea Cake by Kate @ KateAlice Cookbook
GF Mocha Buttercream Yellow Birthday Cake by Dr. Jean Layton @ GF Doctor Recipes
GF Nina’s Hot Milk Cake by Charissa @ Zest Bakery
GF Traditional Birthday Cake by Karen @ Cooking - Gluten Free!
GF Vanilla Cupcakes by Winnie @ Healthy Green Kitchen
GF White Cake with Apricots & Blueberries by Brooke @ B and the Boy
GF White Chocolate Cupcakes by Caleigh @ Gluten Freek(k)

GF Cake by Ratio by Shauna @ Gluten Free Girl

Monday, August 1, 2011

1 Gluten Free Pork Burgers


So I've eaten two burgers in the past two years, this recipe being one of the two. Last summer I went to a cookout in DC where there were salads, burgers, and hot dogs. To avoid eating wheat in the buns, I skewered the burger on a fork and ate it almost like a giant meat lollipop. I can definitely say that I got a few odd looks.

So I was very happy to find Udi's Gluten Free Bagels in my grocery store. All I have to say is I love Udi's, they has such amazing texture in taste in their projects. I fully recommend it to anyone who has to eat gluten free.
Prep Time: 10 minutes
Cook Time: 6-8 minutes
Yields: 2 burgers

Ingredients
3/4 lb ground pork
1/4 cup gluten free Italian or plain breadcrumbs
2 oz pancetta, diced
1/4 cup Pecorino Romano cheese
1 tbsp oregano
2 tsp garlic powder
2 tsp onion powder
salt and pepper
2 Udi's Gluten Free Bagels
Ketchup, onions, baby spinach (and any other condiments of your preference)

Steps
1. Combine the pork, crumbs, pancetta, cheese, oregano, powders, salt and pepper. Divide evenly into two patties.
2. Preheat a grill pan to medium heat and lightly oil. Place the patties on the grill pan, and let cook for about 3-4 minutes. Flip the patties and cook for another 3-4 minutes. 
3. Remove the burgers and place the bagels face down on the grill, allowing them to form grill marks. Will take about 4 minutes
4. Assemble the burger, topping with ketchup, onions, and spinach.

I hope you enjoy!