Showing posts with label Video Recipe. Show all posts
Showing posts with label Video Recipe. Show all posts
Monday, May 21, 2012
0 How to Select and Cook Steak and Corn
Hey everyone, with Memorial Day weekend around the corner, I wanted to share a short video on how to choose and easily cook a steak to the doneness that you desire. This video is also my first experiment at learning how to use Google+ recording, so I hope you enjoy!


Thursday, March 17, 2011
0 Gluten Free 40 Minute Beef Stew

Happy St. Patrick's Day!
For those who may not know and haven't been pinched yet, its St. Patrick's Day, and I wanted to present a food inspired by my Irish heritage. First and most importantly though, for those who consume alcohol tonight, please drink responsibly. If you live in a major metro area, check the internet for free cab services. Most cab companies in larger cities will provide these services for your safety, so please take advantage of it if you need to.
Now, onto the food! Pressure cookers are amazing tools in a kitchen, and aren't as hard or intimidating as many think they are. For those who don't know, pressure cookers are a great alternative to cooking foods in a significantly shorter amount of time. Most foods that you would braise or do in a slow cooker can be reduced down to a 20-30 minute cook time in a pressure cooker.
As for the stew ingredients, I substitute beef stew chunks for lamb due to personal preference, but feel free to substitute with lamb. Also, I like to make my stews really thick (one of my co workers thought I was eating Shepard's pie instead...) so if you prefer a thinner stew use less potatoes.

Ingredients
1.5 lbs beef stew cubes
5-6 carrots, peeled
1 onion
2-3 cloves garlic
2 cups beef broth
6-7 potatoes
2 tbsp oregano
1/4 cup diced parsley
1 tsp corn starch
about 1 tsp salt, vary to taste preference
about 1 tsp pepper, vary to taste preference
Steps
1. Preheat the pressure cooker to medium high heat. Fill a large pot with water and bring to a boil. Dice the onion and carrots, set aside. Mince the garlic, set aside. Peel and cube each potato into eights or tenths, depending on the size and set aside.

2. Add 1 tbsp oil to the cooker, and brown the beef and onions. Keep both moving so they do not burn. Add the garlic, broth, and carrots. Seal the pressure cooker, and maintain heat on medium high. Once you seal the cooker, do not attempt opening it until all pressure is released. Once the pressure cooker alerts that it is sealed (normally through some indicator) and the pressure release starts hissing with steam, start a timer for 20 minutes and reduce the heat to medium. I added the video below to illustrate how the cooker will behave when you want to start the 20 minute timer.
3. While the pressure cooker cooks, boil the potatoes. By the time the 20 minutes is done, the potatoes should be tender and cooked. Drain the potatoes when done.
4. Once the 20 minutes are up, remove the cooker from heat, and let rest for 5 minutes. Then, place the cooker in the sink and pour running water over it. Do this until the pressure is released. You know the pressure is released when the pressure release does not release any steam, and there is no resistance when trying to open the cooker.
5. Place the cooker back onto low heat and add the potatoes, salt, pepper, oregano and parsley. After about 5 minutes, taste and add more salt and pepper if needed.

I hope you enjoy, and please be safe tonight!
4. Once the 20 minutes are up, remove the cooker from heat, and let rest for 5 minutes. Then, place the cooker in the sink and pour running water over it. Do this until the pressure is released. You know the pressure is released when the pressure release does not release any steam, and there is no resistance when trying to open the cooker.
5. Place the cooker back onto low heat and add the potatoes, salt, pepper, oregano and parsley. After about 5 minutes, taste and add more salt and pepper if needed.

I hope you enjoy, and please be safe tonight!
Sunday, January 30, 2011
2 Foodbuzz 24x24: Brinner and a Book
Flashback to a year ago, when the greater Washington D.C. area saw the worst snowstorm its had in years; people dubbed it the only thing logical. The snowpocalypse. D.C. and its surrounding cities experienced upwards of 2 feet of snow that shut the metro area down. It was such a big deal that whenever I enter the word "snow" into my phone it now decides to auto-fill with snowpocalypse.
Why is something a year ago relevant today you may ask? Aside from the fact that D.C. experienced another snow storm this past week that turned rush hour commutes into 8 to 10 hour events rather than the normal .5 to 1 hour routines, the weekend of last year's snowpocalypse was supposed to be my roommate Zak's birthday party. Sadly, due to people's inability to travel he had to cancel his birthday party. A year later, I came across the opportunity to participate in the January Foodbuzz 24x24, a 24 hour dinner party hosted by 24 different individuals across the world. Needless to say I was ecstatic when I learned that I could participate in this event, and celebrate my roommates birthday with our closest friends. So welcome to my first Foodbuzz 24x24 post!
When Breakfast meets Dinner...
That's where we come to Brinner and a Book. A few months ago, while out in D.C. with friends, one of my friends vocalized the idea of spending the day relaxing with friends while wearing pajamas, drinking wine, and reading books under the warmth of blankets. I then mentioned the idea of adding brinner to the event, which is having a breakfast meal for dinner. Needless to say, we decided right then and there to have a relaxing, book reading, food eating birthday for Zak on the last weekend of January.


The Food


Breakfast for dinner gave me the opportunity to flex my creativity and turn some classic American breakfast platters into fun dinner items. The other fun twist on this meal was the dietary restriction. I found out last year that I needed to be on a gluten-free diet (which makes the consumption of many traditional breakfast dishes impossible) so I had to come up with gluten-free alternatives for some dishes. Also, I found out that some of our guests were vegetarians, so I made some tweaks to parts of the menu that I will share with you all. So, onto the first dish...
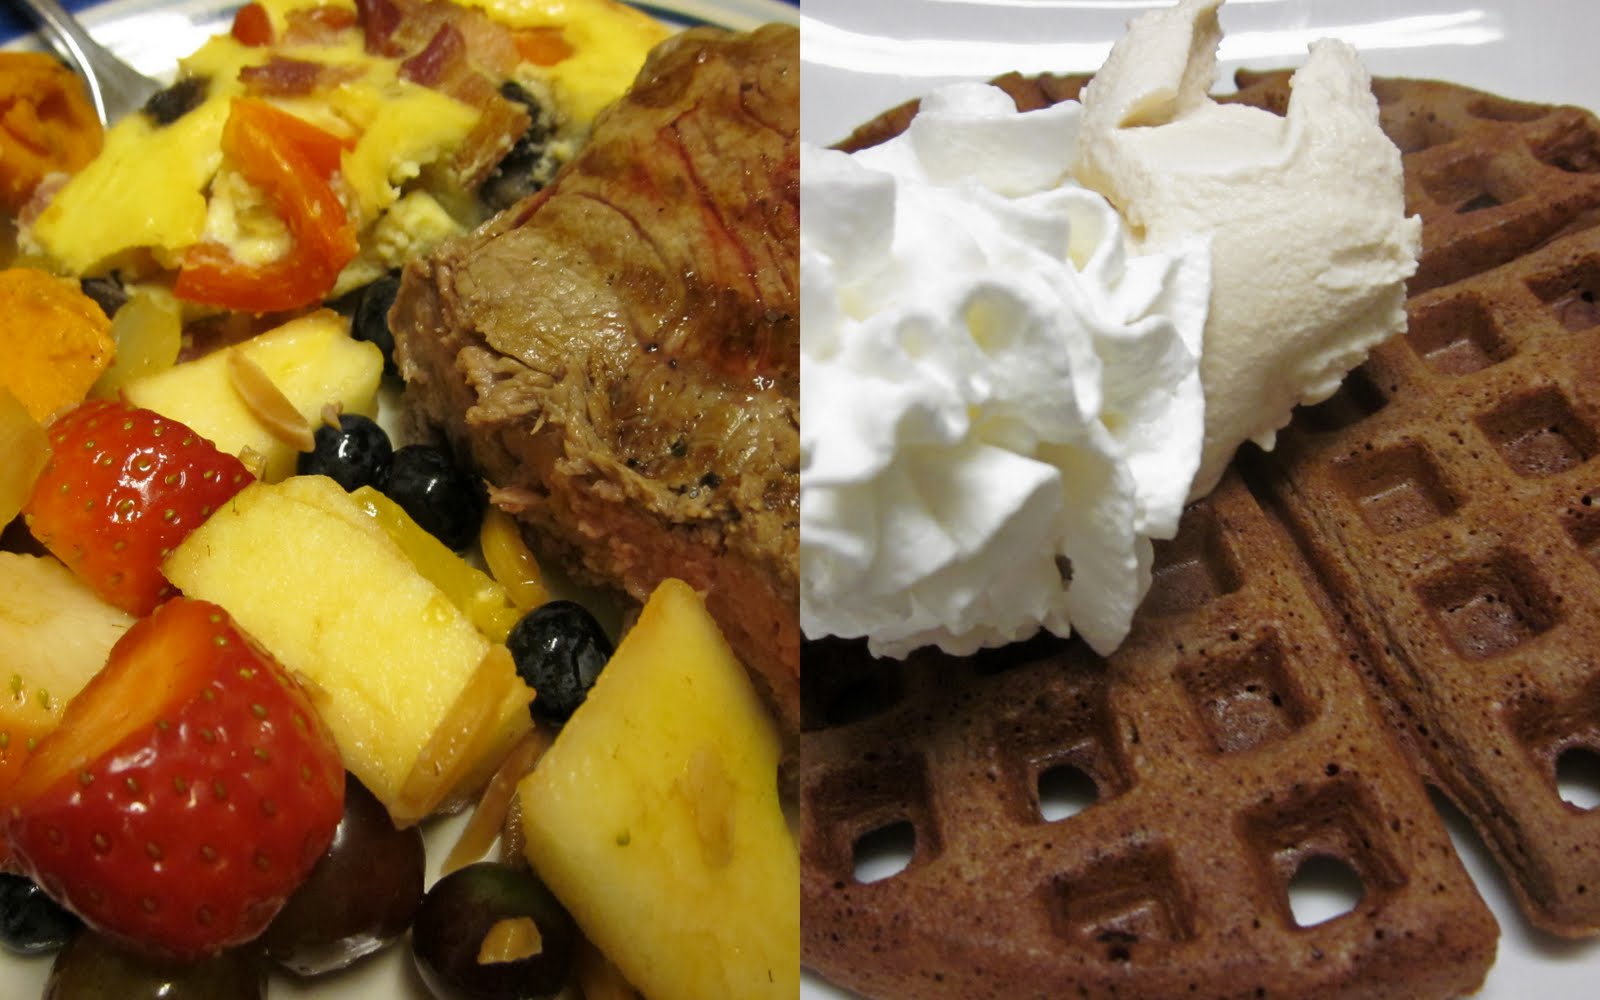
Steak and Eggs: NY Strip Steak and Bacon-Tomato Frittata

The main course of the dinner was a spin on the tradition steak and eggs dish, which became NY Strip Steaks with a side of Bacon-Tomato Frittatas.
How to Cook the Steak
Cooked the steaks using a grill pan over medium heat. Once the pan comes up to heat, spread some olive oil over the pan, and salt and pepper both sides of the steak. Cook the steaks on each side for about 5-6 minutes per side, and cover them with either a lid or a sheet of aluminum foil to capture the heat. Apply pressure with the back of a fork on the tops of the steaks to tell if they are done rather than cutting it open. If you feel quite a bit of resistance when you try to push down the steak, it should be close to done. Remove the steaks from the pan, and cover for about 5 minutes. This lets the juices of the steaks to rest inside the steaks, while cutting a steak open to test for done-ness leaks juices and dries out the steak.
The Frittata
I wanted to make a frittata instead of typical eggs or omelets to have a fun, cultural twist on traditional eggs. A frittata is similar to omelets, but has a few differences. Frittatas normally have the eggs poured into a pan, and then the fillings are added on top. Also, the eggs are not stirred when poured into the pan, allowing a crisp outer layer to the frittata. The link to the detailed recipe is located here. I've included a video below detailing how to make it, including important cooking and safety tips.
Fruit Salad with Balsamic Almonds
I wanted to make a light side dish to counter-balance some of the heavier dishes, so a light fruit salad was the logical choice to me.

-Strawberries
-Blueberries
-Red seedless grapes
-Raspberries
-2 oranges
-1 crisp ted apple
-Juice of half a lemon
-3 tbsp balsamic vinegar
-1 tsp white wine
-1/4 lb sliced almonds
Steps
1. Preheat the oven to 350F. Spread a layer of almonds on a cookie sheet, and lightly salt. Toast the nuts for about 3 minutes. When out of the oven, toss in a tablespoon of the vinegar.

1. Slice the greens off the strawberries, and slice in half. Add to a medium bowl.
2. Peel the orange, and slice into half-pinwheels. Add to the bowl.
3. Core the apple, and slice into pieces the same size as the oranges. Add to the bowl.
4. Add all the other fruits to the bowl.
5. In a small bowl, whisk together the wine, juice, and remaining vinegar. Add the nuts and juice to the bowl, and lightly toss.

Sweet Potato Hash
Another iconic dish to breakfast is hash browns. For dinner, I wanted to use fresh, local sweet potatoes and flavors such as cinnamon and maple to tie in some other breakfast flavors.

-2 to 3 sweet potatoes, diced into 1/2 inch cubes
-1 medium onion, diced
-2 tbsp ginger
-2 cloves garlic, minced
-2 tbsp cinnamon
-1/4 cup maple syrup
-dash salt and pepper
Steps
1. Preheat a deep pan over medium heat. To this add the potatoes, ginger, cinnamon, S&P, and maple syrup. Cover with a lid, and stir occasionally.

2. While the potatoes cook, sautee the garlic and onions in a tbsp of olive oil until the onions are translucent.
3. Add the onions and garlic to the potatoes, and cook for about 20-30 minutes, stirring constantly, or until a fork inserted to the potatoes goes through.

All together on one plate...
When cooking all of the above, I found out that some of our guests were vegetarian, so I made one or two alterations, such as cooking an additional frittata without the bacon. The entire meal was a huge success, and everyone loved the main course and sides, especially the frittata and hash.

However, there was one more surprise for everyone. I mean, you can't have a dinner party, nor could you have a breakfast party, without some...

Needless to say that this was the star of the show. For this I used a gluten free flour blend of 1 cup white rice flour, 2/3 cup potato starch, 1/3 tapoica flour, and 1/2 tsp xantham gum. I like this blend because of the flavor and texture. Also, with this I've realized that homemade coffee ice cream is completely and utterly (ha, cow joke. get it?) amazing...
Thank you to everyone for reading, I hope you enjoyed reading this as much as I enjoyed preparing it. Also, thank you again to Foodbuzz for this wonderful opportunity. The recipes for the Steaks, Fruit Salad with Balsamic Almonds, and Sweet Potato Hash are included in this post, while the recipes for the Frittata and Waffle can be found here:
Happy Sunday Everyone! And...
 |
| Happy Birthday Zak! |
Friday, December 31, 2010
1 Gluten Free Mozzarella Sticks

When you go on a gluten-free diet, you occasionally get cravings for food that you never really liked, or crave when you smell it and confuse its hot, greasy unhealthiness as the best thing on earth. For me, mozzarella sticks are one of those smells; the mix of fried breading and melted mozzarella paired with the perfect marinara sounds and smells intoxicating. So for a final recipe before New Year's, I wanted to adapt this appetizer for the gluten-free crowd. Also, this is an awesome recipe to prepare for guests if you're hosting a party, or to bring to any parties if you want to bring something a little different. I hope you enjoy!
Serving Size: 12 people
Makes: 12 3/4 x 3/4 mozzarella sticks
Prep Time: 10 minutes
Cook Time: 3-4 minutes per stick, overall 20 minutes

-1 lb mozzarella cheese block, cut inton 3/4 inch x 3/4 inch sticks
-4 eggs
-2 tbsp milk
-1 cup canola oil
-1/8 cup rice flour
-2 cup gluten-free breadcrumbs, or milled corn if you cannot find gluten-free breadcrumbs
-pinch salt and pepper
-1 tsp parsley
-3/4 tsp garlic powder
-1/2 tsp onion powder
-1 tsp oregano
-1/2 tsp basil
-1/4 tsp thyme
-3 tbsp grated Parmesan cheese
Steps
1. Pour the oil into a deep pan, and heat on the stove-top to medium heat.
2. Pour the flour onto a small plate.
3. In a shallow dish, whisk the eggs and the milk.
4. Pour all other ingredients, aside from the mozzarella sticks, into another shallow dish. Mix well.
5. Test the oil if it is ready: take a pinch of the crumb mixture and drop into the oil. If the crumbs start to sizzle in the oil, then the oil is hot and ready.
6. (This step is shown in the video below). Take a mozzarella stick, and roll it in the flour (make sure to cover the ends). Then roll the stick in the egg mix, and roll in the crumbs, covering completely. Roll the stick in egg and crumb mixture again, covering all of the stick with the crumbs. (This ensures a crispy outer shell of breading, and minimizes cheese leakage while cooking.) Gently pick up the cheese-stick, and place on end of the stick into the oil, followed by the other. You do this method to ensure that oil does not splash back onto your hand.
6. Cook on each side for about a minute, or until the outside of the stick is browned.
7. Remove from oil, and place on a plate with paper towels. Tab the excess oil off, and transfer to a plate without paper towels (if you leave it on the paper towels, the cheese will stick to the towel).
8. Serve the sticks with your favorite marinara sauce, and enjoy!

Friday, October 29, 2010
0 Gluten Free Smores Brownies
.JPG)
I'd like to note that if the video seems a bit choppy, its because the entire video had to be 4 minutes. However, I really hope you enjoy this playful take on a campfire classic!
Ingredients:
-1.5 cups gluten-free graham cracker crumbs
-.25 cups sugar
-6 tbsp melted butter
-8oz bittersweet chocolate
-12 tbsp butter
-1 cup white rice flour
-1/3 cup potato starch
-1 tsp baking powder
-.5 tsp salt
-
2 cups sugar
- 4 large eggs, room temperature
- 1 tbsp vanilla
- a bag of mini marshmallows
- a package of milk chocolate mousse mix
- 1 cup milk
Steps:
1. Preheat an oven to 350F, and line a 9x9 square baking pan with aluminum foil.
2. Create a double boiler with a small pot of shallow boiling water and a glass bowl. Fill the glass bowl with the 12 tbsp butter and the chocolate to begin melting.
3. In a bowl, mix the 1/4 c sugar, 6 tbsp butter, and graham cracker crumbs. Spread out the mixture in the pan, and place in the oven while making the brownie batter.
4. Mix the flours, salt, and powder in a medium bowl.
5. In another bowl, cream the eggs, vanilla and 2 cups sugar.
6. Once the chocolate mixture has melted completely, slowly add a small amount to the eggs. Mix until incorporated in order to temper the eggs to the same temperature as the chocolate. Fully combine the chocolate and egg mixture until well blended.
7. By about half cups, add the flour to the chocolate until well blended.
8. Pull the pan out of the oven, and pour the batter into the pan, and spread evenly. Place back in the oven for about 30 minutes. Use a toothpick to check when done; when inserted toothpick comes out clean, the brownies are ready.
9. When brownies come out clean, remove from oven and turn the oven to broil. Place a single layer of marshmallows over top the brownies, and place back in the oven. Keep a close eye, and remove when marshmallows start to brown. This will take about 1 minute.
10. While the brownies cool, combine the mousse mix and milk. Whisk for 5 minutes.
11. Once the brownies completely cool, put the mousse into a bag, snip off a corner, and squeeze the mousse on top of the brownies.
12. Enjoy!
Subscribe to:
Posts (Atom)