Sunday, November 27, 2011

0 Food Blog of the Month: Garlic My Soul


Hey everyone! I hope y'all had an enjoyable Thanksgiving weekend! 

Over the break, I was thinking of fun new features that I could add to my blog. One of the new features I came up with was a fun idea to share my favorite food blogs with y'all, spotlighting one a month. 

First blog I wanted to share is Garlic My Soul, a food blog co-hosted by one of my friends Corelyn. They post recipes on a regular basis, and have some pretty drool-worthy food photography and recipes. Be sure to check it out!

Here's the link! Garlic My Soul

1 Friendsgiving Part 2


Hi everyone! I hope you have all survived work the past couple days in the week after Thanksgiving. Last year my friends and I decided to have a Friendsgiving (Thanksgiving with Friends) and that was so successful that we decided to hold another one!
Photo courtesy of Mary Ryan
This year I made the turkey and stuffing once again, while everyone else brought something to the potluck (including a delicious gluten free pumpkin pie!) We had a wide assortment from jello salad, delicious brussel sprouts, corn pudding, green bean casserole, and so much more!
Another of Mary Ryan's photos...delicious!
Also, thank you to Mary Ryan for 90% of these photos. They are all amazing photographs that I had to use for this post!
Mac and Cheese Recipe (not gluten free)
Here is a photo from Mary's macaroni and cheese, it looked delicious, and I am determined to figure out how to make it gluten free...as well as Oren's sweet potato hash dish. I could eat the entire dish of them, soooo delicious!

Such a tasty salad. And quite colorful.


As for my contribution, I wanted to share the recipe for my gluten free stuffing. It's easy to prepare, absolutely delicious when stuffed in a turkey (I know there's possible health risks, but you just cannot beat stuffed stuffing. #BestThanksgivingSideEVER). However, you can just as easily bake the stuffing inside of a dish as well. If you have fresh herbs available, I recommend using fresh herbs. Something about the aromatics of fresh herbs elevates the vibrant delicious taste of stuffing.

Serves 6
Prep Time 15 minutes
Cook Time Stuffed, duration of the turkey or chicken it is stuffed within. Dish, 30 minutes

Ingredients
1 loaf of your favorite gluten free white bread. I recommend Whole Foods brand if available, cubed
3 tbsp dried oregano
2 tbsp olive oil
1 yellow onion, diced
3 cloves garlic, minced
4 stalks celery, diced
1 Pink Lady apple, diced
2 tbsp rosemary, diced
1 tbsp sage, diced
2 tsp thyme, diced

Steps
Preheat an oven to 350F. Line a baking sheet with aluminum foil, and lay the bread out in a single layer. Coat with the oil and oregano, and toast for 7 minutes.

While the bread toasts, sautee the onions and garlic over medium heat until the onions are translucent. Add the celery and cook for another 3 minutes.

Once the bread is out of the oven, place them into a bowl and combine with the onion, garlic, celery, apple, and herbs. Season with salt and pepper.

For a stuffed preparation, stuff the prepared turkey or chicken, and cook the bird as intended, adding another 5-10 minutes cooking time per pound due to the stuffing. Alternatively, bake the stuffing in a greased baking dish for 30 minutes.

I hope you enjoy, and happy December!

Monday, November 21, 2011

1 Host the Perfect Dinner Party: Start Your Plan of Attack with A Great Grocery List

We have all been to graceful and chaotic dinner parties: what separates the two? Throwing a dinner party starts with a mound of work that must be whittled down into the perfect spread.  From appetizers to dessert, the easy flow of a dinner party starts with the solid base of a complete and efficient grocery list.   By building the dinner menu around low-prep or pre-prep dishes, time and effort spent in the kitchen will be cut in half, so you can focus on the much harder work of entertaining your guests!

Part of a great dinner party is keeping everyone’s hands full.  Have a drink station set up with ice and glasses for light and easy cocktails and a couple of corked bottles of crisp whites.  Set out hors d’oeuvres that give the guests something to munch on while they wait for everyone to arrive, but don’t fill them up before dinner!  Provide them with an assortment of artisan cheeses, crackers, bowls of spiced or candied nuts and/or olives and a tray of bite sized assorted fruits such as grapes, sliced apples and pears.  All of these can be taken straight from the grocery bag, washed and/or sliced, and then served.   

Main dishes that can cook while you work on other things are the best use of your time.  Roasting, baking or slow-cooking dishes can free your hands to welcome guests, top off drinks and get the salad course ready without having to juggle too many pots and pans.  Make the dressing in advance so you can sprinkle in a few chopped veggies, cheese and possibly nuts. Then toss with dressing to serve. Make it easy on yourself with a simple French vinaigrette, or play with adding a little local flavor to enhance seasonal ingredients. 

For the main course, roast pork tenderloin with seasonal vegetables can be put in the oven and left unattended till the buzzer dings.  Chili, stew, or roasted winter root veggies in a leek broth can be prepped hours ahead and left to cook on their own till serving time.

After the dinner dishes have been scraped clean, to wind down the evening it is time to serve dessert and coffee or a digestif.  Here is where it is acceptable to cheat on preparation. If you don’t have time to bake a cake or other yummy treats, head to the bakery and pre-order or pick up a lovely in-house tart to share with your guests.  Brew a pot of coffee, slice and serve. Another course accomplished in under 10 minutes!

Don’t let dinner parties seem daunting; even larger groups are quite manageable if you’re armed with the right grocery list.  Lower the work to a minimum with easy to prepare foods that look fancy and taste great, keep the food and drinks coming, and the evening is sure to be a hit!

Sarah W. is a guest writer from the Blog Content Guild who writes on the subject of healthy eating, living, and lifestyles. 

Wednesday, November 16, 2011

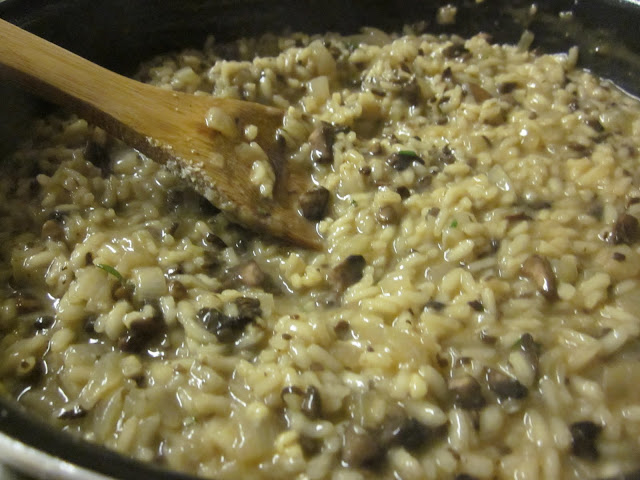
4 Mushroom Risotto


A couple months ago I tried making risotto out of the box before but it ended up having a horrible texture. After that I decided I would try to make risotto on my own, even though I've heard it is a relatively hard dish to make. That and it always seems to be the one dish that gives contestants trouble on those cooking shows, so it has to be hard, right?

Here's my first recipe for mushroom risotto, I hope you enjoy!

Cook Time 40-50 minutes
Servings 4

Ingredients
1 tbsp olive oil
1 onion, chopped
3 cloves garlic, minced
1 cup Arboria Rice
1/2 cup Reisling wine
1/4 cup Parmesan cheese
4 1/2 cups hot chicken stock
2 Portobello caps, cubed
2 tbsp balsamic vinegar

Steps
In a large saucepan, sautee the onions and garlic in the oil until the onions are translucent. While they are cooking, heat up the stock in a small pan over medium heat.

Add the rice to the onions, and coat with the oil. Add the wine to the pan, and constantly stir until the wine is absorbed. Add the stock to the rice by the cup as the rice soaks up each addition of liquid, stirring constantly while the rice cooks.
While the risotto is cooking cook the mushrooms and vinegar in a small pan over medium heat until the mushrooms are tender. Add them to the risotto after all the liquid has been added to the pan. Add the cheese as well.

Stir until all is combined, and serve with your favorite protein and leafy green. Enjoy!

Sunday, November 13, 2011

3 Gluten Free Chocolate Bark


I hope everyone is enjoying November so far! This past Halloween, I made a quick and easy chocolate bark for a party, and it was a total hit. This is a really simple bark to make, and is a great recipe to make with children or friends. 

If you want to customize for Thanksgiving, add some pumpkin seeds to the bark. For Christmas, include candy cane bits and use Christmas colored m&ms.

Serves 12 squares
Active Prep Time 5 minutes
Inactive Prep Time 2 hours

Ingredients
7 oz dark chocolate
1/4 cup Glutino gluten free pretzels, broken into pieces
1/4 cup milk chocolate m&ms
1/4 cup chopped walnuts

Steps
In a microwavable bowl, melt the chocolate in 30 second intervals until completely melted. Lay parchment paper onto a baking sheet. Once the chocolate is melted, spread it onto the sheet until it is between 1/8th and 1/4th inch thick.

Sprinkle the pretzels, candies, and walnuts onto the bark, and press into the chocolate. Let it cool to room temperature, about 2 hours. Cut into squares and serve!

Saturday, November 5, 2011

31 Squashlove: Portobello Spaghetti Squash


Hey everybody, it's officially fall (now bordering on winter) so what better time to share squash recipes of all variety! Last month was my first opportunity to participate in a #love blog hop, and this month is my first chance to co-host it. #love events are composed of a whole variety of food bloggers who share recipes showing their love for a certain ingredient. Last month the theme was applelove, and this month we are sharing squash recipes. Pumpkin, acorn squash, spaghetti squash, butternut squash, they're all ingredients we're showing respect to this month! Thanks to EA Stewart for introducing me to the blog hop group!

My main contribution to this month's event is my Portobello and Pancetta Spaghetti Squash. As someone who is gluten free, spaghetti squash is a godsend. I don't quite understand how it happens, but spaghetti squash has this amazing texture after its cooked that looks just like angel hair pasta! Even better, a good spaghetti squash has tons more flavor than angel hair pasta, and can provide a delicious taste to an overall meal. I came up with a fairly simple sauce that combines the richness of Portobellos and butter, the salty pork flavor of pancetta, and the aromatics of white wine. For this recipe, be sure to use a white wine you would drink. I recommend the flavor that a Reisling provides, but you can feel free to use whatever is handy. Check out my recipe at end of the post, under the blog hop!


Thanks to all of the other co-hosts for this month's #squashlove event!

Baker Street | Anuradha : @bakerstreet29
Bloc De Recetas | Salomé : @blocderecetas
Bon à croquer | Valerie : @valouth
Cafe Terra Blog | Terra : @cafeterrablog
Elephant Eats | Amy 
Food Wanderings | Shulie : @foodwanderings
Hobby and More | Richa : @betit19
Mike's Baking | Mike : @mikesbaking
Mis Pensamientos | Junia : @juniakk
My Twisted Recipes | Dudut : @mytwistedrecipe
Queens Notebook | Elizabeth : @mango_queen
Simply Reem | Reem : @simplyreem
Skip To Malou | Malou : @malou_nievera
Teaspoon Of Spice | Serena : @tspcurry
The Daily Palette | Annapet : @thedailypalette
The Professional Palette | Regan : @profpalate
The Spicy RD | EA : @thespicyrd
Vegan Miam | Rika : @veganmiam

Feel free to add your favorite squash recipes to this bloghop! 


Portobello Spaghetti Squash with a White Wine Sauce


Prep Time: 10 minutes
Cook Time: 30 minutes for the squash in the oven, 15 minutes for the sauce.
Serves: 4

Ingredients
1 spaghetti squash
salt and pepper
3 ounces Pancetta, diced
1 tbsp olive oil
2 cloves garlic,minced
1/2 yellow onion, diced
2 Portobello mushroom caps, cubed
2 tbsp butter
1/2 cup Reisling
Feta Cheese for garnish


Steps
Preheat the oven to 350F. Slices the spaghetti squash in half, and then scoop out all of the seeds. Drizzle the insides with olive oil, and generously salt and pepper. Place face down on an aluminum foil lined baking sheet. Bake for 30 minutes or until the flesh is tender. Once baked, set aside for 5 minutes.

While the squash bakes, sautee the pancetta over medium heat until crispy. Remove the pancetta from the pan, and set it aside for later. Add the oil, garlic, and onion to the pan. Sautee until the onion is translucent. Add the mushrooms, butter, and wine to the pan, and cook until the the wine reduces and a sauce begins to form, about 10 to 15 minutes.

With a fork, shred the flesh of the squash into spaghetti-shaped strands. ( see image next to ingredient list ). Empty the squash into the pan, and add the pancetta back to the pan. Over low heat, mix all the ingredients until the squash is coated with sauce. Add salt and pepper to taste.


I hope you enjoy, and feel free to share the squash love!

0 Mocha Chip Parfait

Hey everyone! I hope yall are having a great beginning to your weekend. Last month, through Foodbuzz I received the opportunity to try Godiva coffee. Not only did the flavors smell and taste like they were described, but went wonderful with desserts. Here's my recipe for Mocha Chocolate Chip Parfait!

Serves 8 people
Prep Time 20 minutes
Inactive Prep Time 30 minutes

Ingredients
Gluten Free Chocolate Chip Cookies of your preference
1 4.5 oz box of chocolate pudding mix
1.5 cups of milk
.5 cup room temperature brewed Godiva Caramel Pecan Bark coffee
Whipped Cream

Steps
In a medium saucepan, stir the mix, milk, and coffee over medium heat. Once the pudding starts to boil, stir constantly for one minute, and then remove it from heat. Let it sit for 5 minutes, then stir it constantly for another 5 in order to cool it down. It is ready for the next step once room temperature.

In high ball shot glasses or some other dessert presentation, crumble the cookies into the glasses until there is a 1/4 inch layer of cookie on the bottom.
Pipe the pudding into each glass until halfway full.
Add a dollop of whipped cream, then add another layer of cookie. Fill to the top with chocolate pudding. 

When ready to serve, garnish with additional whipped cream. I hope you enjoy!

As part of the Foodbuzz Tastemaker Program, I received Godiva Pumpkin Spice and Caramel Pecan Bark coffee.

Wednesday, November 2, 2011

12 Gluten Free Ratio Pie


Hey everyone! Its the first Wednesday of the month, and time for the Gluten Free Ratio Rally! With the holiday times approaching, we decided to tackle gluten free pie crust this month! For those who are new to the Ratio Rally, it's based upon Rhulman's baking ratios. If you want to know more about these, check out Ruhlman's book on Amazon.
I will admit this Ratio Rally was second in difficulty to the pate a choux Rally a few months back. (That one still ranks as the hardest thing I've attempted from a culinary aspect). The difficulty I've experienced with gluten free pie crust in the past is their delicate nature. Historically for me it's been much easier to tear or break gluten free crust versus traditional wheat crust (curse you gluten). However, with my experiences this month and the knowledge shared between the group, I think I've made my best gluten free pie crust thus far.

Also, thank you to Lisa for hosting this month, and to everyone who shared their tips and methods! Be sure to check out Lisa's post here.

And here are the rest of the posts for this Rally, let me know if you'd be interested in joining!

Jean Layton from Gluten-Free Doctor Cheese Crusted Apple Pie
Kate from katealicecookbook Kale & Zucchini Tart
Jenn from Jenn Cuisine Sweet Potato and Duck Pot Pie
Caleigh from Gluten Free[k] Leek and Potato Pie
Rachel from The Crispy Cook Maple Walnut Pie
Claire from Gluten Freedom Autumn Pumpkin Spice Pie
Silvana Nardone from Silvana’s Kitchen Chicken Potpie
Caneel from Mama Me Gluten Free Green Tomato Pie
Meredith from Gluten Free Betty Blueberry Pie
Shauna from Gluten-free Girl and the Chef Fresh Pumpkin Pie
Erin from The Sensitive Epicure Chess Pie 
Brooke from B & the boy! Pot Pie
Lisa from Gluten Free Canteen Frangipane Apple Tart
 ~Mrs. R from Honey From Flinty Rocks Mock Apple Pie


Serving Size 8-10 people
Active Prep Time 20 minutes
Inactive Prep Time 6 hours
Bake Time 15 minutes

Ingredients
Crust:
150 g white rice flour
100 g tapioca starch
50 g potato starch
100 g cold shortening, cubed
100 g cold butter, cubed
100 g ice cold water
1 tsp salt

Filling:
7 oz dark chocolate
2 tbsp sugar
2 cups cold heavy whipping cream

Whipped cream for garnish

Steps
Crust: In a food processor, pulse the salt, flour and starches to mix them. Add half of the shortening and butter and pulse until the flour and fat starts to collect into crumbs. Scrape the sides and bottom of the processor, add the rest of the fat, and pulse until the fat is distributed throughout the flour. While adding small amounts at a time, pulse the water into the flour mix just until a dough forms and is sticky to the touch. This may not require the whole 100g. 

For those who've made wheat flour pie crusts before, this dough will feel much stickier than you are used to. Don't worry, that will be normal. Wrap the dough tightly and refrigerate for 4 hours.

Preheat the oven to 350F. When ready to roll out, place a sheet of plastic wrap onto a counter, and generously cover with tapioca starch. Unwrap the dough and place onto the plastic wrap. Dust the dough with tapioca starch, and cover your rolling pin in tapioca starch. Gently roll the dough out into the shape of a circle, slightly bigger than your pie tin. You'll want a thickness of about 1/8th of an inch. Be sure to constantly dust your rolling pin and the top of the dough with starch to prevent sticking to your pin. When at your desired thickness, carefully put your hands under the plastic wrap holding your dough and invert into the pie tin. Gently tuck the dough into the pie tin, fitting the shape. If there's any cracks, use excess dough to fill them in. Place the dough in the oven for about 15 minutes, or until crispy and slightly golden. Let the pie crust cool completely.

In a double boiler, melt the chocolate with the sugar until the chocolate has completely melted. Remove the chocolate from the heat, and let cool to room temperature. In a large, cold mixing bowl, whip the cream until peaks form. Gently fold the chocolate into the whipped cream, and spread into the pie crust. Refrigerate for 2 hours before serving, and serve with whipped cream. I hope you enjoy!