Sunday, November 28, 2010

0 Thanksgiving Leftovers: Chicken and Rice Soup


I found a really good recipe for making soup from leftover turkey meat and vegetables. With this recipe, you can use store bought stock, or any homemade stock (for pointers on making your own stock, click here). I hope that you enjoy!

Brown Rice and Turkey Soup from AllRecipes.com

Saturday, November 27, 2010

0 Thanksgiving Leftovers: Turkey Stock


One useful way of using leftover parts of a turkey is making turkey stock. Turkey stock can be used in any recipe that asks for stock, and makes a great base for poultry soups.

Steps:

  1. Toss the carcass and bones left over from a turkey into a pot. Add garlic, celery, onions, and a mix of any other left over vegetables.
  2. Cover the bones with about an inch of water, and turn the stove to medium heat for half an hour. Every 5-10 minutes skim the fat from top of the stock water.
  3. After half an hour, turn the heat down to low and leave for about 3 hours. Every 30 minutes skim the top of the water for fat.
  4. Pour the stock water into a fine strainer to remove all meat and vegetables. Strain a few more times to remove other material that is not stock. 
  5. Cover and refrigerate overnight. The next morning, skim the top of the stock for fat. As the stock chills, it will congeal due to the gelatin in the bones. Once heated, the stock will return to its previous state.
Enjoy!

0 Homemade Cranberry Sauce

Not for the diabetic

You'll need:
- 1 cup sugar
- 1 cup Orange Juice
- 16 oz organic cranberries
- 1/4 cup dry white wine
- whisk
- pot with lid
- potato masher

Directions:
- Whisk together sugar and oj and bring to a boil on medium.
- Add cranberries and let boil until cranberries have popped
- Mash cranberries and add wine.
- Keep stirring for about 5, let stand to thicken and serve.

2 Turkey Preparation and Cooking


Last week I prepared a turkey for an alternative Thanksgiving that I had with friends. Below I have details and tips to make your turkey look like above.


  1. Preheat an oven to 375F.
  2. Thoroughly rinse the outside and inside of the turkey to clean it. Pat the turkey dry, and place into a large roaster or roasting pan. Brush the outside of the turkey with softened or melted butter. 
  3. If cooking in a roaster, cover the turkey with the top. If cooking in a roasting pan without a top, cover the entire outside of the turkey with aluminum foil. 
  4. Cook in the 375F oven for about 30 minutes, and then turn the oven down to 325F. The total amount of time that the turkey must cook will be approximately 15-20 minutes per pound. After about 2 hours of cooking, start basting the turkey with the juice at bottom of the pan, and baste about every 30 minutes to an hour. During the last 30 minutes of cooking, uncover the turkey so that it browns the outside. Using a thermometer, check the turkey for when its done at 165F.
  5. Most importantly, leave the turkey alone for about 20-30 minutes before slicing so that the juices do not run out and leave the turkey dry.
Enjoy!

2 Amazing Tomato Soup

There is nothing quite as great as hot soup in winter !
And this recipe is great since it's easy and incredibly tasty.

What you'll need:
- 2 cans of 280z tomato puree
- 1 quart mushrooms
- 1 large onion, chopped
- 5-6 cloves of garlic, finely chopped or pressed
- 1 cup chicken broth
- 1 tsp salt

You will also need a:
- blender
- pan
- fairly large pot
- whisk

What to do =)
1. Bring puree, salt & broth to a slow simmer while whisking them together.
2. Sautee onions with half of the garlic.
3. Blend onions until smooth, and whisk into soup.
4. With remaining garlic sautee mushrooms until they shrink. Add to soup.
5. Let simmer for another 20 min in order to allow flavours to amalgamate.
6. Sprinkle a little rosemary on top and serve!

Note: goes well with a little sour cream

Tuesday, November 23, 2010

1 THE CRISPY COOK: The Semi-Annual List of 100+ Gluten-Free Blogs

While reading Twitter today, I came across this blog post, which is a list containing over 100 Gluten-Free blogs. For those who cook gluten-free and want new ideas, I recommend going here!

THE CRISPY COOK: The Semi-Annual List of 100+ Gluten-Free Blogs

1 Trans-Siberian Turkey Weekend


Happy Turkey Week! To celebrate, I'll be posting a roasted turkey and turkey leftover recipes (all gluten free), so look forward to that! I hope that those who have this week off of work, school, etc. have been enjoying themselves thus far, and that everyone has safe travels and good food!

This past weekend I had two significant events to kick off my week off: a trip to see the Trans-Siberian Orchestra and an Alternative Thanksgiving.

Thursday I attended the Trans-Siberian Orchestra at the Verizon Center with a group of my friends. We had seats in the nosebleed section of the theater, but lucked out and received floor seats from one of the employees at the Verizon Center. The result? The perfect seating for one of the best light show/Rock-Christmas concerts you could possible attend. (Some of the better images I captured included below.)


On Saturday, my roommates and I invited a group of friends over for an Alternative Thanksgiving that we could all have with one another. We had decided weeks ahead to purchase a free range turkey from a local Virginia farm. In early November after visiting some local farmer's markets and calling around, we came in contact with a farm west of Farfax called Smith Family Farms.

I've gone to many farmer's markets, but I had never traveled to a farm for produce or protein. It was such a fun process driving to the farm And seeing how a small farm operates. We were able to meet and discuss with the people at the farm, and with the person that prepared our turkey. After roasting, our friends came over in the evening, and we had a huge Thanksgiving feast!


Later today or tomorrow I will post the directions as to how to roast a turkey in the oven (whether its 10 or 36 pounds) along with recipes for transforming leftover turkey into something new and awesome.

0 Donkey Kong Country Returns: Mid-way Review

Image from GameInformer
A few months ago after E3, I posted links and previews to Donkey Kong Country Returns (DKCR), a new Nintendo Wii game, developed by Retro Studios, that brings Donkey and Diddy Kong back to their roots. I personally have many fond memories growing up playing the originals on the Super NES, so I had high hopes and expectations for it. Needless to say, DKCR far surpassed my expectations.

The gameplay in this game is similar to the original Donkey Kong Country, but has enough elements to change it up. The most obvious change is the inclusion of shaking controls. Using various directional inputs and a shake of the remote, you can roll, ground pound, and blow air onto elements in the map to make secrets appear. I was initially worried about this, fearing it would be too gimmicky. However Retro Studios does a wonderful job of making the motion controls fun and inventive. In addition to this, DKCR is perhaps one of the most difficult 2-d platformers I have ever played, rivaling and even perhaps surpassing some of the red plumber's best games. DKCR balances the difficulty making it not infuriating, but enjoyable.

Perhaps even more than the actual gameplay, the atmosphere and presentation of the game blew me away. The visuals look like they could be on the Xbox or PS3, and the bright colors really pop out of the screen. The style of this game is some the most beautiful out there, including some silhouette-drawn levels that left me playing the level over and over just to see the beautiful art style again. 
Image courtesy of IGN.com
Meanwhile, some of the music will cause many older players to reminisce of the older SNES, while the rest of the soundtrack is an amazing addition to the Donkey Kong music library. 


Thus far I'm only half way through the game, but with lots of hidden collectibles and secrets, I foresee myself and others playing this for days to come. If you own a Wii and haven't turned in on in weeks because you aren't sure what to play in it, go buy this game. You'll be very happy you did.

Wednesday, November 17, 2010

0 Gluten Free Lime Pie


There are two flavors that I really enjoy in desserts, and that's citrus and chocolate. I've posted a variety of chocolate desserts, and realized last week that I craved something with lemon or lime in it; so what else other than making a key lime pie to satiate that desire. Lime pie is fairly easy to make in general, requiring a low number of ingredients and steps. I hope you enjoy, I know we did! (The pie was consumed between 5 people in the course of a day...)

Ingredients
-juice of 10 limes (end goal is to produce a little over 1/2 cup juice)
-1 1/2 cup gluten free graham cracker crumbs
-2 tbsp sugar
-6 tbsp melted butter
-1 can condensed milk
-4 egg yolks
-1 tbsp powdered sugar
-1/3 cup whipping cream


Steps
1. Preheat the oven to 350F.
2. In a medium bowl, combine the graham crackers, sugar, butter, and the zest of one lime. Evenly spread the mix into a pie pan, and place into the oven for 10 minutes.

3. In another medium bowl, gently whisk the egg yolks. Whisk the condensed milk and juice into the eggs until well blended.
4. Once the pie shell is done, add the pie mix into it and return to the oven for another 13-15 minutes.
5. Let the pie cool to room temperature, and store in the refrigerator for eight hours before serving.
6. When the pie is ready to serve, whip the cream and powdered sugar. Top the slices of pie with the cream and some lime zest.
Before Oven
After oven

Tuesday, November 16, 2010

0 Pork Loin Roast

So I've cooked pork many different ways in recent memory: pulled pork, pork chops, tenderloin, etc. However, something that I don't cook very often is a pork loin  roast. This is partly because of how much longer it takes then a tenderloin or chops on a weekday, and also because I typically cook only for one person.

Therefore, I decided to take a chance and make a pork loin roast for dinner this week. I pretty much followed this recipe exactly, and it turned out really well. One big difference between my cooking and the recipe though is that I don't have a roasting pan. Under the cut is my cheap and easy trick for those like me without a roasting pan. Enjoy!


Saturday, November 13, 2010

0 Gluten Free Lasagna


One of my favorite foods has always been lasagna, which was one of the things that made finding out I was allergic to gluten last year depressing at first. However, I've found gluten free lasagna noodles at my local Whole Foods, so hopefully if you need to use a gluten free version, you have a comparable store next to you. Enjoy!

Ingredients
-1 box lasagna noodles
-1 lb ground beef, chicken, or turkey
-2 16oz bottles of tomato sauce
-1/2 onion, diced
-1/2 diced red pepper
-3 cloves garlic, diced
-1/4 cup oregano
-1/4 cup shredded Parmesan
-1 1/2 cup ricotta cheese
-2 cups mozzarella cheese

The box of lasagna noodles will have directions as to how to prepare the lasagna. Follow the directions, but make sure to do the following:
  • In the water that the noodles boil in, add a generous amount of olive oil. This helps prevent sticking.
  • Under cook the noodles by about 3-4 minutes. This will make them easier to handle, and all the moisture from the cheese and sauce will help the noodles cook fully.
  • Use low moisture or part skim cheeses. This will help the lasagna from becoming too wet.
  • Saute the onions and garlic before adding to the sauce.
  • Cover the lasagna with aluminum foil while cooking, and for the last 10-15 minutes, cook uncovered so the lasagna browns.
  • Once the lasagna is cooked, let it sit for about 20 minutes. This will allow the lasagna to rest enough so that it is still warm/hot, but does not fall apart when serving.
Enjoy!

Wednesday, November 10, 2010

0 Reese's Brownies (Gluten Free)


So like I've mentioned before, I've been having a really busy time at work for the past month or so. So busy in fact that have another 2 or 3 recipes ready to post, but am too tired to do it all in one night. But one of many things I like to do to relax and destress during difficult times is cook; in fact, nothing is better than trying to come up with new recipes that people will like.

While this recipe is not highly original (cake influenced by this recipe), I hope that you all enjoy this (because myself and others have). Also, this is designed as gluten free, but you can substitute the gluten-free flour and xantham gum for all-purpose wheat flour. I hope you enjoy this fun and delicious recipe!

Serves: 18 cupcakes
Prep Time: 20 minutes
Baking Time: 30 minutes

Ingredients
-1 3/4 cups gluten free flour
-2 tsp xantham gum
-2 cups sugar
-3/4 cups sifted cocoa powder
-2 tsp baking soda
-1 tsp baking powder
-1 cup milk
-1/2 cup canola oil
-2 eggs
-1.5 tsp vanilla
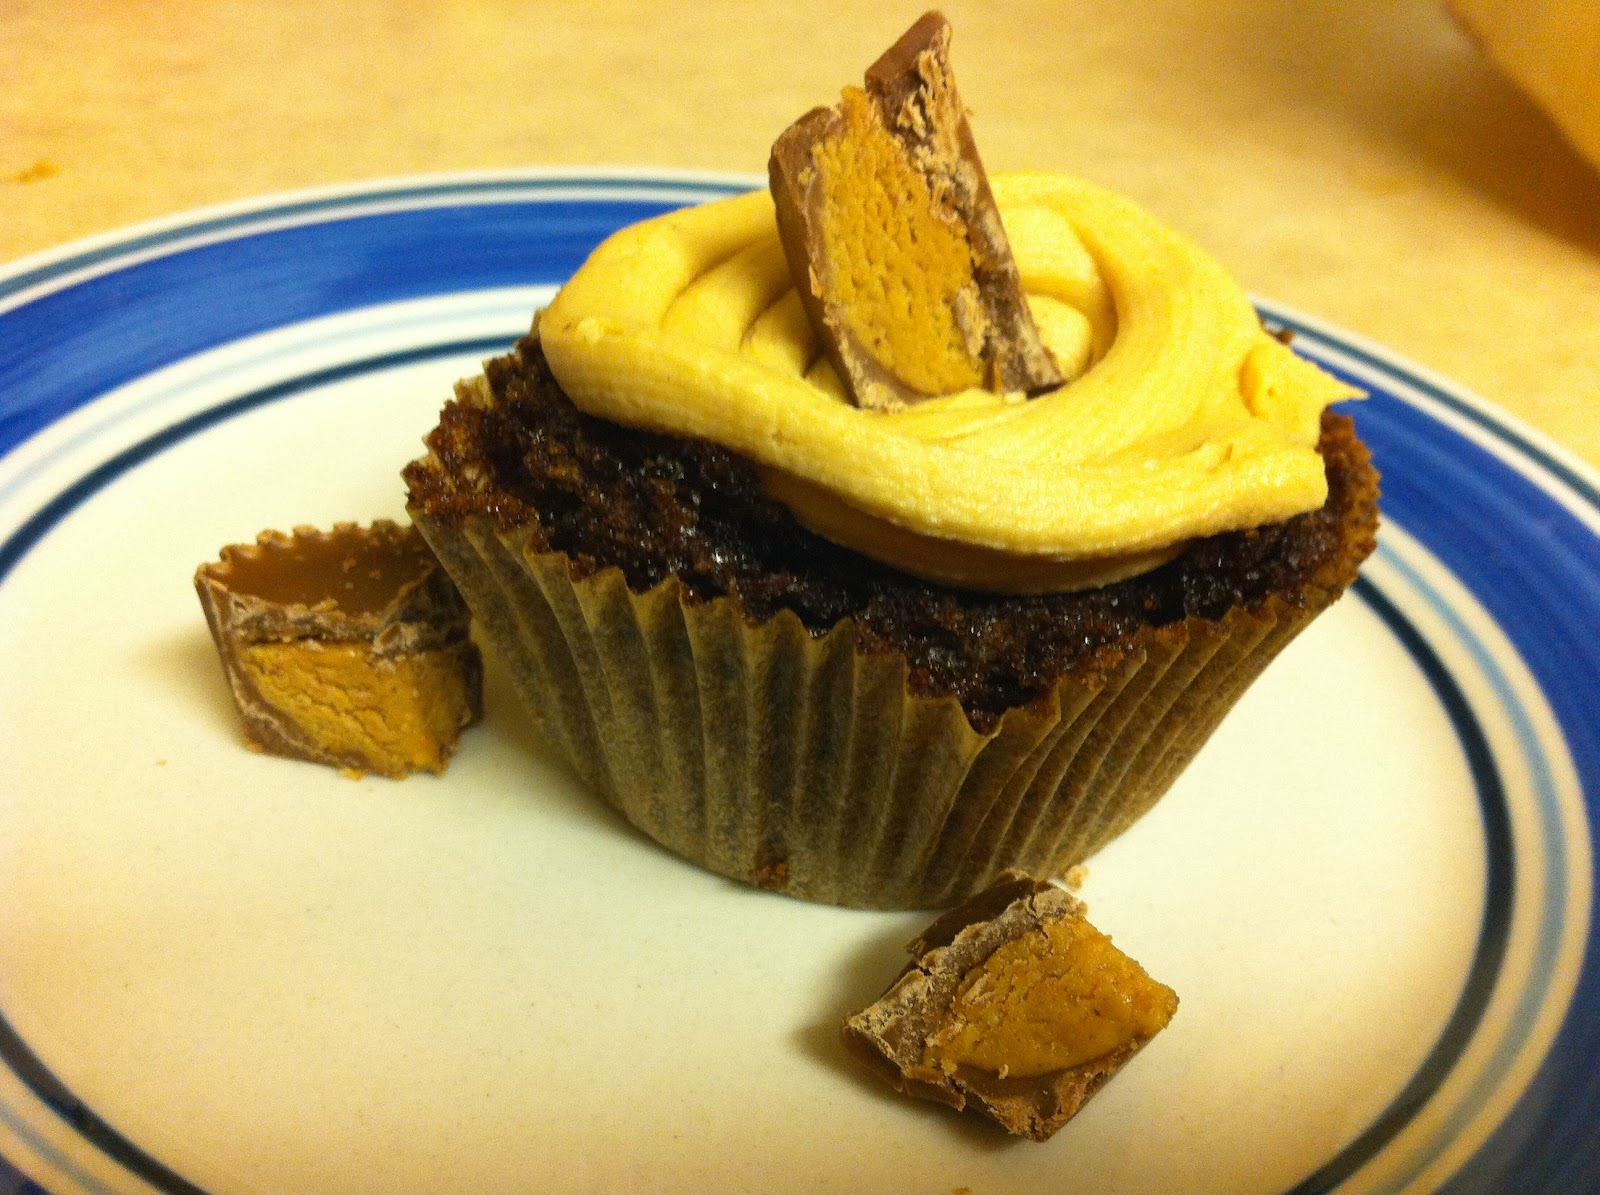
-miniature Reese's cups
-1/2 cup Reese's peanut butter chips
-1/2 cup butter
-1 tsp vanilla
-1 cup powdered sugar

Steps
1. Preheat oven to 350F. Line 18 muffin cups with muffin liners.
2. Sift the flour and cocoa powder into a medium bowl. Add xantham, baking powder, and baking soda to the bowl. Mix together until blended.

3. In a medium bowl, mix 2 cups sugar, eggs, and vanilla. Add the milk and oil to the bowl, and mix until well blended.

4. Blend the flour mixture into the liquid, by about half a cup each time. Mix until a well blended batter forms.

5. Add about one spoonful into each muffin cup. To these, place a Reese's cup into each muffin.

6. Top each muffin cup with another spoonful of batter, until each cup is approximately 3/4 full. Place into the oven for about 25 minutes until the tops are cooked, and a toothpick inserted to the cupcake comes out clean. Let the cupcakes cool completely. Once cooled, remove from the tins. If the cupcakes overflowed, trim the edges off.

7. In a small bowl, melt the peanut butter chips in the microwave at 50% power. While this cools for a minute or two, whip the butter in a medium bowl. Once the butter is whipped, combine with the peanut butter and vanilla. Then add the sugar gradually to the butter mixture until the icing gains a consistency and sweetness that you are satisfied with.
8. Fill a sandwich bag with the icing, and snip about 1/8th inch from one of the corners. Use this to pipe the icing onto the top of the cupcakes. Garnish with chopped peanut butter cups.

Sunday, November 7, 2010

0 Polenchos (Gluten Free)


First off, sorry for not posting many things this week, this is my 7th straight day of work, so that's been occupying a large amount of my time. also, I was working one two new recipes, one of which I chose not to post it because it did not turn out the way I wanted. This however, is a good transition to today's post, an experiment that involved marrying polenta and nachos...

In a discussion with one of my friends, we decided that I should come up with a more mature, dinner version of nachos. Thus, I decided to use polenta as a substitute for tortilla chips in order to make it easier to dish out the meal to those eating (and thus the name: polenta + nachos = polenchos). For those who don't know, polenta is a dish that is very similar to grits, only cooked with a different type of cornmeal.

Ingredients 
-Pre-cooked Polenta
-1 lbs ground beef, chicken, or turkey
-Half a bag of taco seasoning
-Green onions
-Half a can of pinto beans
-2 cups grated cheddar cheese


Steps
1. Preheat oven to 350F. Line a baking sheet with aluminum foil. Preheat a grill pan to medium high heat, and oil the grill pan. Preheat a medium pan to medium heat.
2. Slice the polenta into thin circular slices.

3. While the grill pan is heating up, cook the ground beef until no pink is visible. Drain the grease once the meat is done.

4. In a cup, mix the taco seasoning and a little bit of water. Add the meat and seasoning to a bowl and mix well.
5. Once the grill pan is heated, place the polenta on the grill, and cook until grill marks are visible on the polenta.

6. Line the polenta on the baking sheet, and layer meat, beans, chopped green onion, and cheese.


7. Bake in the oven for 5-10 minutes until the cheese is completely melted. Once out of the oven, cut the polenchos into squares and enjoy!


This week I'm making a variety of different recipes, so I will have a lot more to post in the next couple days!

Tuesday, November 2, 2010

0 Roasted Potatoes

So this post could be introduced with a story that is either half full or half empty. The half empty side is that I admittedly fail at getting a final picture of this side dish when I made it. While the full side that this is because I made this side dish for two of my brothers and they ate it up along with the steak I made in about 5 seconds flat...I'll go with half full! Yay friends, family, food, and fall!

On a total tangent, anyone else excited for Harry Potter in less than 3 weeks?

Ingredients
-5 red potatoes
-3 chopped garlic cloves
-1 ambrosia apple
-1 palm (i.e. enough to fill one palm in your hand) of oregano
-1 palm basil
-3 tablespoons extra virgin olive oil
-1 palm thyme
-2 palms parsley
- salt and pepper


Steps
1. Preheat oven to 450F. Line a baking sheet with aluminum foil.
2. Quarter the potatoes and place in a bowl.
3. Core the apple, and cut into chunks. Add to the potatoes.
4. In a small bowl mix all other ingredients.

4. Toss the potatoes with the oil mixture, and spread out onto the sheet. Bake for 30 minutes or until golden brown.

5. Enjoy!